

Apply WRB
The window/door rough opening needs to be waterproofed and airsealed before the window/door unit is set in place. Typically the WRB is installed running across the rough openings. If you're doing multiple blower door tests on your project, you can test the airbarrier application before cutting window openings. That way, if testing again after window install, you're able to isolate the issues.

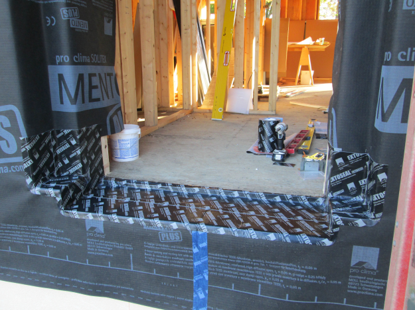
Having the WRB run continuously across the rough opening has the added benefit of providing rain protection during construction, keeping interiors dry prior to window install. When the windows arrive to site the WRB is then cut in an hourglass or martini glass shape.


These cut shapes make it easy to fold the WRB into the rough opening and mostly cover the rough opening’s framing with the WRB at the jambs and header. There will be triangles that need additional tape or membrane at the corners. The amount that’s needed to fill in will be based on the depth of the rough opening.
Special Attention For Corners

Corners are common leak locations
Cutting wide strips of the membrane or taping the gaps in waterproofing works well or VISCONN can be brushed on for a quicker application. VISCONN is watertight and a good option for header and jamb waterproofing. Sills should be treated with a vapor-closed waterproofing since there could be standing water on the horizontal surface. Water pooling on a vapor-open material will diffuse inwards. The corners of the WRB turning into the rough opening is a common leak location.
Start by patching corners from scraps left from window cutouts:


2 options for covering the small gap that's left:
1) Bowtie tape is typically used to seal holes at the corners

2) Two pieces of TESCON VANA tape overlapping at the corner.

Waterproofing Sills
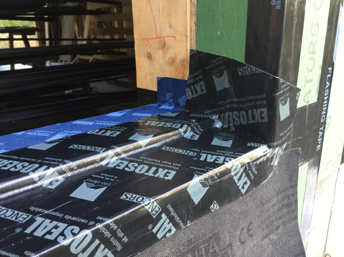
After the WRB has been turned into the rough openings then the EXTOSEAL ENCORS tape is then installed on the sills. The EXTOSEAL ENCORS should overlap the WRB’s vertical face 1” at the sill. The ENCORS should turn up the jambs 4”-6”.

EXTOSEAL ENCORS tape is used to waterproof the sills. This vapor-closed tape is used for horizontal substrates where there could be standing water
The EXTOSEAL ENCORS should come past where the window unit will be located on the interior side. It is best practice to make a little lip on the interior side of where the window unit will sit – the EXTOSEAL ENCORS should cover this lip so that it’s acting as a “back-dam”. EXTOSEAL ENCORS comes in 6", 8", and 12" wide options. If the project has deeper sills then multiple pieces of EXTOSEAL ENCORS can be used. The exterior piece is installed first so that the EXTOSEAL ENCORS' tape seam is overlapped to provide proper drainage.
EXTOSEAL ENCORS used to protect the deep window sills

EXTOSEAL ENCORS tape is stretchy to be able to seal corners properly
Showing back-damming lip interior of where window unit will be located

EXTOSEAL ENCORS wrapping the sill to the interior side of where the window unit will be located
When EXTOSEAL ENCORS is used for door sills the EXTOSEAL ENCORS is typically brought about 12" up the jambs to provide backsplash protection. TESCON PRIMER RP or VISCONN should be used to treat any masonry prior to EXTOSEAL ENCORS install to ensure the best adhesion.

If the project is taping to the interior side of the windows as well, then the interior window tape can act as the back-dam. The interior window tape (ex. TESCON PROFIL, TESCON PROFECT, CONTEGA SOLIDO IQ) is airtight, watertight, and vapor permeable. Since they’re watertight they can be used as the interior back-dam. The other option is to slope the sill towards the exterior. Many projects are using a rip cut from a piece of clapboard siding to create this exterior pitch. The concern with this approach is that it’s typically installed over the sill’s rough opening and can create a dam on the exterior side of where the window frame sits. Ideally the slope begins at the interior side of the window frame, but this can make setting the window unit plumb an issue.

Sill protected with EXTOSEAL ENCORS
The sills are protected with a vapor-closed tape because there could be standing water on the horizontal substrate. If the project is using a window buck or similar framing that protrudes past the sheathing to help support the unit then there might also be a horizontal substrate at the headers. These header scenarios also need to be protected with a vapor-closed tape (EXTOSEAL ENCORS). It is recommended to slope the header’s buck on the top side to promote drainage.

Window buck airsealed at the jambs with TESCON VANA tape and waterproofed at the sills and top side of header with EXTOSEAL ENCORS tape
