

Plaster is a great airtightness solution for party walls. But connections to the joists need to be addressed. This Ecostruct project achieved 0.23ACH50 after this plaster job + airsealing joists with Tescon Vana and Tescon Primer RP.
Joists are tricky three-dimensional objects, when it comes to the air barrier. Anywhere joists penetrate an air barrier - interior or exterior - you have a job that needs to be designed and planned for to be successful. If you add up the total inches of cracks around a building full of joists, you have possibly hundreds of feet of air pathways that will leak. If joist sealing is not considered in advance, it can be a major issue for high performance assemblies. Luckily, 475 offers robust solutions for the hard parts, along with guidance on methods and materials to make your air sealing job easier.
Soffits, overhangs, sistered joists and brick walls all leak air - and not a little, a lot. They leak even if they are double, triple or quadruple wythe walls. Even if the joists are tightly fastened. And even if it looks tight on the day of installation. You need long-term airtightness that can compensate for the expansion, contraction and settling of the structure. Throughout the seasons, fluctuating moisture content and temperatures result in fraying mortar, cracking compound, moving wood and shrinking caulks.
The solution for durable airtight connections is to use systematized tape connections that can be optimized for a one- or two-person job. It's possible to do quickly and effectively with methods that work for you.
Materials
 CONTEGA SOLIDO EXO/EXO-D and CONTEGA SOLIDO SL/SL-D discontinued. See: CONTEGA SOLIDO IQ or CONTEGA SOLIDO IQ-D
Vapor Permeance: Vapor variable material < 0.13 - 8 US perms
Interior/Exterior: Both
Method of Connection: Full-surface adhesive (CONTEGA SOLIDO IQ-D has multiple release strips)
When to use: CONTEGA SOLIDO IQ® is a humidity-dependent window tape for interior OR exterior airtightness with smart vapor control. The only tools you'll need are a utility knife and the Pressfix.
 TESCON VANA 100
 Vapor Permeance: 8 perm
Interior/Exterior: Both interior and exterior
Method of Connection: Full surface SOLID acrylic adhesive
When to use: When you want to use the same tape that you're using for all the rest of your building. TESCON VANA is the best all-around tape. It's good at everything. At 4" wide, VANA 100 gives you enough width to make the job easy. With it's split release paper you get 2" on the wall and 2" on the joist. Use with primer at masonry or plaster walls. The fleece face of the TESCON tapes can be plastered over. Consider CONTEGA HF at wood checks. And use TESCON PROFIL if you want to leave beams exposed.
 TESCON PRIMER RP
 Vapor Permeance: Permeable
Interior / Exterior: Both interior and exterior
Method of Connection: Liquid-applied, paint or roll on
When to use: When the surface you're connecting to is porous or unstable. This includes masonry, plaster, oily OSB, flakey joist surfaces, and anything that might not be sturdy enough to stay airtight on it's own. In certain situations you can skip this Primer if you're using CONTEGA SOLIDO SL or EXO - if the substrate is solid but porous.
 CONTEGA HF / CONTEGA CLASSIC
 Interior / Exterior: Both interior and exterior use
Method of Connection: Caulk cartidge or sausage tube
When to use: To ensure tapes are bonded fully to uneven materials, to fill drilled holes in sistered joists, or to airseal checks/splits in wood joists. Can also be used at outside corners before taping to assure tape overlaps are fully bonded and airsealed.
Methods
Rabbit-Ear Taping

- Cut a length of tape enough to cover the width of the joist side, plus 1 to 2 inches on either side. Position the tape centered over the joist, and fold where the joint of the tape will be. With a blade at 45° cut a slit in the tape near - but not right at - the corner of the joist and the wall.
- Remove the backing strips and apply the tape. Use Pressfix to push into the corner if necessary. Make sure the rabbit ear wraps the corner flatly. The benefit of not cutting the 45° slit right at the joint in the previous step is seen here. The corners are the weakest link in the airsealing, and that excess gives you coverage.
- Cut a length of tape for the next side of the joist and repeat the steps for cutting rabbit ears, making sure not to cut the tape that was just applied.
- Again, wrap the rabbit ear flatly around the side...
- And use the Pressfix to pressurize all applied tape and ensure the corner is well-connected.
- Check the corners one last time: is there a possible pathway for air? If so use CONTEGA HF to fill the gap. CONTEGA HF will likely not be needed if using CONTEGA SOLIDO tape. There's a slightly greater chance when using TESCON VANA/PROFIL because the tape backing is not as flexible as the CONTEGA SOLIDO.
Dog-Ear Taping

- Leaving the release strips on the tape, wrap around the joist, making 90° cuts at each corner. Cut only the tape that will adhere on the wall side, do not cut the tape that will adhere to the joist. When you get back around to the beginning, overlap the tape by about 1/2" and cut.
- You now have one long piece that can wrap the beam, with four 90° cuts, connected by the thin strip of tape that will adhere to the beam. This is beneficial because the tape at the beam will be continuous all the way around. If your joists are all the same size and shape, you can use this piece as a template to prepare a similar, pre-cut piece for every beam that needs to be sealed. This makes the process much faster (but doesn't work in old houses as all beams will be different...)
- Remove the release strips and apply to each beam. You may want to start with the thin release strip and apply to the joist before you remove the release strips that apply to the wall.
- As with the rabbit-ear method, the joist corners are potentially the weakest link. To cover those, cut small squares, large enough to fill the gap in the tape.
- Remove the release strips and apply, ensuring the corner comes up to the edge of the tape applied to the joist. Use the Pressfix to pressurize all applied tape and ensure the corners are well-connected. These square pieces could also be cut diagonally to create right triangles, with the right angle of the triangle applied at the corner of joist. As with the other tape, these pieces could be pre-cut ahead of time.
- Check both sides of the corner patches for possible pathways for air. If so use CONTEGA HF to fill the gap. CONTEGA HF will likely not be needed if using CONTEGA SOLIDO tape. There's a slightly greater chance when using TESCON VANA because the tape backing is not as flexible as the CONTEGA SOLIDO.
Sister Joist Sealing: Option 1

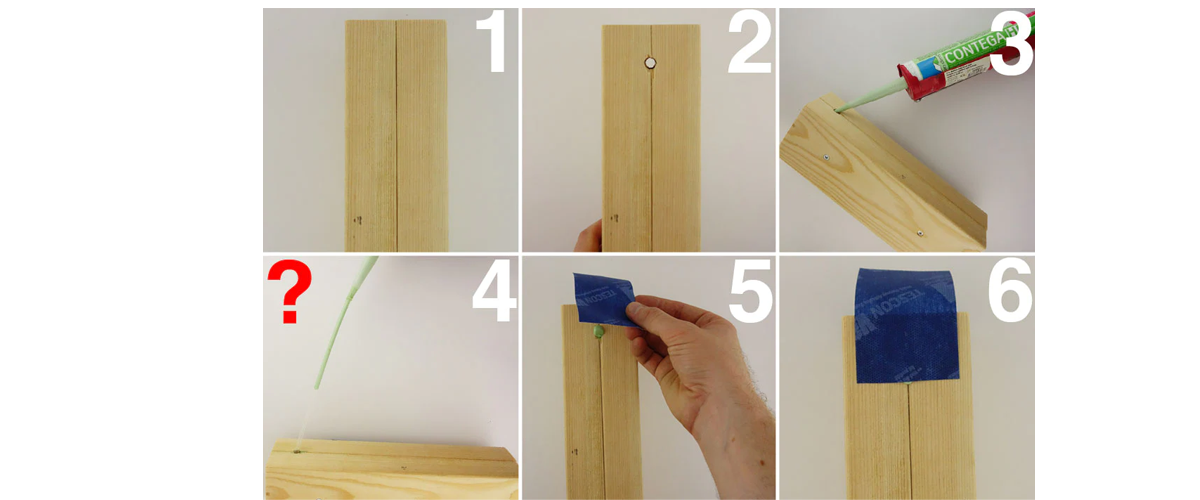
- Believe it or not, those sister joists are going to leak, even when using the methods above. To demonstrate, we've screwed two 2x4's together to represent sistered joists.
- Drill a hole from top to bottom of the joists, all the way through. Aim for right down the middle of the seam. Of course, ensure the hole will not threaten the structural stability of the joists.
- Fill the hole from bottom to top, with CONTEGA HF or CONTEGA Classic caulk.
- Having trouble filling all the way? Use a soda straw. If fits on the end of the cartidge nozzle. And a clear straw allows you to see the caulk as it goes.
- Use a piece of tape to connect from the point where the caulk comes out on the top and bottom, back to where you seal the joist to the wall. This will makes sure the airtight connections are continuous.
- Make sure the tape connection is solid between the wood and the caulk. If the wood is old, cracked, or flakey, used TESCON Primer RP to prime the surface, or used additional CONTEGA caulk to fill cracks and divits.
Sister Joist Sealing: Option 2
Check out this great post on Instagram from Macht Architecture in Rhode Island
Priming

Tape does not always require primer. You will need to judge for yourself, and possibly run some adhesion tests, to see if it is necessary for your situation. If the surface is porous, cracked, flakey, chipped, broken - basically not smooth, new, sanded and solid - we recommend you prime it. Apply TESCON Primer RP to the entire surface you plan to adhere to. Tape can be applied practically immediately, as Pro Clima tapes are vapor-open, which allows the primer to dry and bond. You may also consider sanding down old or damaged wood to provide a smoother surface, or treating masonry to ensure a good connection - but do verify this the bond if you chose that route.
Wrapping It All Up
Now that you have the materials and methods in your toolbox, let's look at some typical situations. As mentioned above, CONTEGA SOLIDO SL is the most highly recommended tape for joist connections. It works for membrane, masonry, metal, you name it. And if you apply carefully, you will need not need adhesive or primer. Also, as you can see in the image above, the SL is translucent, allowing you to see how it's adhering to the surface below. If joists are being sealed on the exterior, use CONTEGA SOLIDO IQ.

You may use 2-3/8" wide TESCON VANA (as well as other similar tapes, such as TESCON PROFECT or TESCON PROFIL), but we recommend you use a wider variety such as the VANA 100 (4"). This gives you enough room to work with, especially when it comes to covering those pesky joist corners. The TESCON VANA solution may be the best if you are applying to membrane interior or exterior, or simply want to use the same tape through the project (since VANA is the tape used on INTELLO Plus and SOLITEX membranes). On masonry walls, we recommend using TESCON Primer RP. VANA 100 costs a little more, but the two release strips help to line up the tape properly, and apply without having the tape accidentally stick to unwanted elements or itself if working in cramped spaces.
Notes On Plaster and Liquid Applied Membranes
Due to the large variety of plasters (and other coatings) available on the market, we recommend an adhesion test to verify that the plaster bonds well to the fleece. Of course, the plaster should be suitable for making an airtight connection. Very sandy cement mixtures, or mixtures with perlite, are not airtight.
Plasters with a high gypsum content in general adhere very well to the polyester fleece. If finishing plasters contain chalk or cement, a primary scratch/parge coat made with portland or lime cement is required for optimal bonding to the fleece. You can also add some portland to the gypsum plaster to reinforce it. Figuring out the best mix takes a bit of experience and practice, but a plaster airtight layer applied 3/8" or thicker can't be beat for material cost and reliable airtightness.
Thin plaster layers are more prone to cracking then thicker coats. In general, 3/8" or more makes them robust enough to resist cracking in the long term. Embedding CONTEGA HF in plaster of that thickness will also prevent unwanted cracking.
Pro Clima adhesive is not recommended to be applied to silicon-based liquid applied membranes. If you must use Pro Clima tapes in conjunction with a silicon-based liquid applied membranes, apply the tape first. This will allow you to coat the liquid applied on to the fleece of the tape, and allow the tape adhesive to bond with the substrate below.
